Cheap gift idea: beginner anime binge list
The holidays are here! If you’re finding yourself scrambling to get those last-minute gifts and you’re strapped for cash, I may have a solution for you. Well, only if you’re looking for an inexpensive gift for a pretty specific person: your anime-curious friend. ? You know who I’m talking about. That friend. They’ve heard all the hype and may be interested in giving anime a try. The one who has possibly asked, “What are the essential anime series to watch?” Perhaps they don’t know where to start, which is super valid. Enter: the beginner anime gift—the Super Amazing Anime Binge List in a jar! Similar to the ever-popular “date night” jars, anime beginners simply choose which series to watch by drawing one lucky slip of paper from a jar (or your receptacle of choice). In this way, the choice is out of their hands and all they have to do is watch! If you’re an anime lover like me, and you’ve had conversations with friends who are anime beginners, I know it’s sometimes really hard to recommend what to watch next. Don’t get me wrong! There are TONS of series to recommend, it’s just so hard to pick ONE. That’s why I created this free printable list featuring many really great anime series for beginners. Get the List How to Prepare the Beginner Anime Gift Print the list and the included jar label. Cut the list along the dotted lines to create the slips of paper that will be drawn from the jar. Crumple up those slips of paper and dump them in a jar, a box, or another container of your choice. Feel free to add more shows to the list! Type up or write down some of your favorites and stick them in the jar too. Slap the premade jar label onto the container. Better yet, make your own custom design to make the gift extra special! Canva is one of my favorite design tools; it’s free and very easy to use. After you give the gift, lay down a few ground rules: If you draw it, you MUST watch it. The majority of the series I picked for this checklist have a moderate amount of episodes. That said, I did include Naruto and Naruto: Shippuden because I truly believe any anime lover has to see it at least once in their lifetime. Side note: I didn’t include One Piece because I didn’t want to scare your friends away from anime. ? Include it if you must, and godspeed to your friend. Yes, you can skip the filler. Speaking of long series, you can totally show them sites like Anime Filler List when they do happen to draw a longer show. As we seasoned anime lovers know, shows like Naruto are notorious for their filler episodes. As much as I love the #1 most unpredictable ninja, I did NOT watch all 700 episodes. ? I thank Anime Filler List for that. ♥ Sub or dub? I’m in the “both” camp, sorry people. On one hand, I really love the Japanese language and personally think that the original Japanese dubs are usually better. There are some really awful English dubs, but there are also some fantastic ones. Make your recommendations to them and leave the choice up to them. You can always watch both. ? As far as where to watch anime, you can use sites like JustWatch to search for each show. It’ll tell you which streaming services carry it and how many seasons they have available. Not every platform carries all the episodes of one show, so just double-check your service once you pick your favorite. And that’s really all there is to it! You can have so much fun with this beginner anime gift idea. Watch the anime your friend pulls from the jar together! My kid sister lives 1,000 miles away, so we video call each other so we can watch new episodes of our favorite anime together. Any anime fan knows that seeing a beginner’s reactions to iconic anime moments is half the fun. Let me know what you think about this super simple beginner anime gift idea! Which anime series should definitely be added to the list? (I am just now painfully aware that I left Sailor Moon off the list…) What about anime movies? Leave your favorites in the comments! P.S. I included ATLA and The Legend of Korra because they definitely deserve a watch even if they aren’t anime.
3 DIY Moana costumes for Mickey’s Not So Scary Halloween Party!
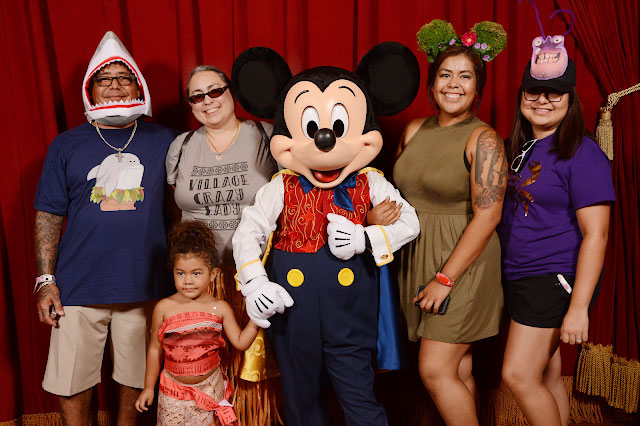
Keep reading below for a step-by-step guide on how I made each Moana costume, complete with pictures r/restofthef-ingowl would be proud of. Yeah, yeah, yeah. Maybe Moana costumes are an overrated choice by now, but look at my goddaughter Sophia in the eyes and TELL HER she doesn’t make a perfect Moana! The hair, the brownness, the hair, the fearlessness, the HAIR.. She’s perfect! And because her mommy gave her life, I convinced her to go dressed as Te Fiti, goddess with the power to create life itself<3 When we talked about what she should wear, I decided that any old flower crown just wouldn’t cut it for a Halloween party at the most magical place on earth. So I made her Te Fiti-themed ears just for the occasion! So when I surprised Amber with the ears on FaceTime, Sophia’s response was (and I quote): “Whaaaat aboooout myyyyyyyyyyyyyy crooowwwnnn????????” And well that just broke my heart so I made a special Moana-style flower crown just for her! As for me, I really wanted to go as Tamatoa for my love of his song “Shiny” and also Jemaine Clement in general. I just didn’t want to make it too complicated, especially considering we’d be running around a theme park with a 3-year-old. So I ordered this shirt from Etsy, glued his face onto a baseball cap (inspired by this pin), and crafted a glitzy “shell”*** that the crab himself would surely add to his dazzling dungeon. Since this post is already gearing up to be monstrous enough for Lalotai, I’ll post a video of our night at MNSSHP separately. This was Sophia’s first time EVER at Disney World, so I wanted to make sure I captured the day as perfectly as I’d captured her mommy’s first visit! I really struggled to find an easy guide to make each of these things online, so I wanted to share how I personally made them, because I doubt Moana is going to be unpopular anytime soon 🙂 Moana’s flower crown I’ll start with the easiest one. I eyeballed this picture when I perused Google for a kid version of Moana’s lovely flower crown. Honestly, Sophia wasn’t a huge fan of wearing this while we were at the park. Don’t get me wrong—it held up completely fine and she adored it, she just got annoyed with it being on her head, so this would probably work better for older kids. Supplies: green ribbon green felt pink felt hot pink pom poms scissors your choice of adhesive (I used hot glue) I wasn’t confident with my freehand leaf and flower-drawing skills, and I wanted them to be as uniform as possible, so I traced the shapes onto paper. Then I cut those shapes out and traced the outline onto the felt using a marker. Don’t worry about cutting the marker outline completely off– you can just glue that side facing down! I’m sure there was a more efficient way to do this, but once I traced the shape onto the felt, I folded the felt sheet in half to cut two shapes out at once. Use whatever method you want to cut out the green leaves and the pink flowers. I ended up using 30 leaves and eight flowers. Depending on the size of whoever’s head this is going on, you may need less or more. Measure the circumference of said person’s noggin and add 10 inches to that length. This is so that there’s enough extra ribbon left to tie into a knot. For example, Sophia’s head measured 20.5 inches so I rounded up and cut 31 inches of ribbon. Now it’s time to glue the shapes onto the ribbon. Put a dot of your favorite glue on the bottom of a leaf shape, measure the ribbon’s halfway point, and press the leaf onto the dead center of the ribbon. The order I glued the leaves was skinny side up, then the next one on top of it, slightly overlapping with the skinny side down. You can choose how far apart you want them, but this is how I did it. (Looking at pictures probably makes more sense than me describing it…) I layered two flower shapes on top of each other to create some dimension, leaving four flowers visible on the finished headband. Once those were glued together, I glued them as evenly spaced as I could on top of the finished leaves. Lastly, glue a hot pink pom pom onto the center of each flower. I wish I would have gotten larger pom poms, but the pack these came in was only 99 cents at Michaels, and I didn’t want to buy more than I needed for larger pom poms… Besides, I think they look pretty cute! Tamatoa’s shiny shell I almost gave up on this project to order a gold sequin backpack online (which would have been perfect), but I just couldn’t find an affordable one. This video inspired me that the project was simple enough not to abandon. Supplies: cardboard twine foil gold metallic finish spray paint decorative sea shells old jewelry, beads, etc. random shiny things glitter spray adhesive of your choice (use something stronger than hot glue!) Cut the best circle you can out of cardboard. I made mine with a 15-inch diameter to fit my back. (I screwed up and did this after I covered it with foil, oops!) Punch four holes into the circle like so. Now you’ve got to decide the left/right and top/bottom of the circle. Designate the holes as top-left/bottom-left and top-right/bottom-right. (This is probably so confusing but bear with me.) Cut a piece of twine as long as you want the strap to be around your shoulder. In my case, it was 30 inches for a comfortable fit and enough room to take it off without breaking. Poke one end of the cut twine through the top-left hole and tie it into a knot so it doesn’t fall out. To secure it even further, glue the knot into the hole. Repeat this process with the
